Step 6: Cleanup existing guest
After creating an invitation flow, a renewal policy, and attaching them to a template, you are now ready to start evaluating guest accounts under Guest in the admin center and to initiate a cleanup.
The cleanup process typically encompasses the following tasks:
- Blocking or deleting guests with long-pending invitations
- Blocking or deleting inactive guests (requires Entra P1/P2)
- Ensuring completeness of guest information
- Assigning an appropriate template
- Designating a host
Please note that steps 4 requires a configured template.
We recommend blocking guests for a certain period, such as 30 days, before permanently deleting them. This allows for a temporary restriction before taking irreversible actions.
Cleanup existing guest
Blocking or deleting guests with long-pending invitations
The guest list displays the invitation acceptance state for each guest as "Accepted" or "Pending". After inviting a guest, Microsoft sends an email with an invitation link to their provided email address. If the guest clicks the link and redeems the invitation, the state changes to "Accepted". If the guest does not follow the invitation link, the status remains as "Acceptance Pending".
To block or delete guests based on their invitation state, follow these steps:
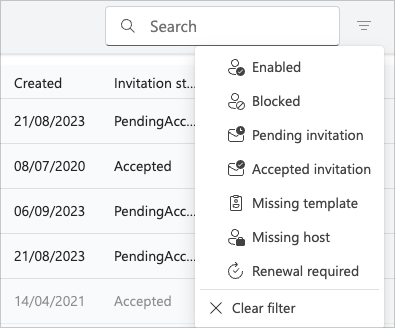
- Filter the guest list based by invitation state.
- Select all guests you want to block or delete.
- Use the actions available in the toolbar to either block or delete the selected guests.

Blocking or deleting inactive guests (requires Entra P1/P2)
Provided that your tenant has Entra ID Premium licenses, the guest list displays the last sign-in date per guest. This makes it easy to identify guests who have not signed in to Microsoft 365 for an extended period.
To block or delete inactive guests, follow these steps:
- Navigate through the guest list and select all guest accounts you want to block or delete due to inactivity.
- In the toolbar, choose the appropriate action to either block or delete the selected guests.
Ensuring completeness of guest information
To update or modify guest information, please follow these steps:
- Open the guest details view.
- Update the values within the fields as needed.
Please note that the information view allows editing only for the fields specified in the associated invitation policy. If you require access to all guest attributes, you can do so by clicking on the user identity link displayed at the top. This action will open the guest details view within Microsoft Entra ID, granting access to a broader range of guest attributes for editing.
Assigning an appropriate template
While the guest list encompasses all individuals within your organization, it's important to note that only those with a Guests template assigned will be subject to the policies established within that specific template. The choice of which guests to manage using this template and its associated policies is entirely at your discretion.
To assign a template to existing guests, follow these steps:
- Select the guests you wish to assign a template to from the guest list.
- Next, click on the "Assign template" action found in the toolbar.
- A side panel displaying the available templates will appear. Here, you can select the template of your choice.
- Confirm your configuration.
The template and its policies will be updated immediately. For the display name policy, please allow up to 5 minutes for automatic updates to take effect based on the new policy. The renewal policy will run on a daily basis to ensure consistent application of policies.
Designating a host
Only your Teams users who are actively collaborating with guests are familiar with their respective guests. This is why Guests' fundamental concept is to delegate guest management responsibilities to the responsible Teams users, whom we refer to as "Hosts."
When you assign a host to a guest, that guest will become visible within the host's Teams app, allowing them to assume control of guest management tasks.
To assign a host to existing guests, please follow these simple steps:
- Begin by selecting the guests for whom you wish to designate a host.
- Then, click on the "Assign host" action, which can be found in the toolbar.
- A side panel will open, allowing you to select the appropriate host for each guest.
- Confirm your configuration.
As an Guests Admin, you retain the flexibility to change the host whenever necessary, ensuring seamless adaptability to your organization's evolving needs.
Continue with Step 7: Deploy the Guests app
Once you've set up your invitation flows, configured your templates and renewal settings, and ensured your guest list is in good order, you're ready to move on to Step 7: Deploy the Guests app.